 Beekeeper meetings (like bee blogs) get short on material in the winter, so our last formal agenda focused on "how to roll beeswax candles."
 Initially, I thought this would be lame. Why? Because the purist in me knew that none of us individually produce the groovy honeycombed beeswax with which we would work. It is, in fact, the same stuff we buy in order to make frames for the the insides of our beehives. I was, however, mollified (and drawn in) by learning that beekeepers actually contribute their melted wax cappings and so on to "wax accounts" at the supply houses. Therefore, while the wax at hand was unlikely to contain any one beeyard's product, it was a wonderful amalgam of pure bee handiwork from all over.
And the scent is terrific, too. As my friend Alexandra said when she got her candles, "they smell good enough to eat or roll in." They smell like the inside of a hive, actually, and you should take any possible opportunity to sniff them out sometime.
The basics of beeswax candlemaking are as follows:
- Order some beeswax from any number of bee gear purveyors – some won't ship to you in cold weather, though, because the stuff can break. I guarantee that your local craft store does not have any;
- Get honest-to-goodness candle wicking, and this is probably available locally;
- Cut the wicking to about 24 inches, enough for two tapers plus some extra;
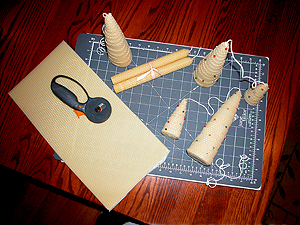
- Take one sheet of the beeswax, and find the middle of the long side. Cut across the wax at a slant that starts about 1/4 inch short of the center line on one side, and ends 1/4 inch over the center on the other. You should end up with two pieces of the same size and shape, mostly square but with one slanted side;
- With the longest side closest to you (the side that comes to the sharpest point), place one end of the wicking along the long edge, with the pointy side on your left and the square on your right, making sure that the wick is roughly even with the square side;
- Begin to fold the edge of the wax over the wick, maybe 1/8 to 1/4 inch wide. It will look pretty uneven at first, but don't worry. Work along the whole edge;
- Once you have the length of the wicking enclosed, begin to turn that edge over and over on itself, gently but firmly. Make sure that the square end of the sheet stays even with itself. The pointy end should begin to form a pointy candle end.
- When you run out of wax, you have made your first candle! Press gently but firmly along the seam at the end, with warm fingers you should be able to work it down mostly smoothe.
- If you want to put a tag on your candle, now is the time. Thread it on the wicking which is sticking out;
- Now, starting from the other end of the wick, make the other candle, pointy end facing the pointy end of the candle you just made.
- When you finish the second candle, you can pick them both us by the wick, and tie a little ribbon around the middle to make a nice presentation.
Remember to trim any wick to 1/2 inch before lighting. Your candles may get a little white haze on them if they sit around a while. If you expose them to warmth, this will disappear.
There are lots of other candle designs around (I used a Christmas tree pattern and some straight pins with pretty heads for mine), but this is the simplest.
But a beeswax candle, like life, does tend to change as it gets older. It gets that homely crust, it don't smell as good as it used to, and it can crack and crumble at the edges. You should go ahead and use your candles, especially during the colder, darker times of the year when the bees aren't around to amaze us.
3 comments:
Yes, I'm in the middle of VA, Farmville, 60 mi So of Richmond. I have about 25 hives now... but may have fewer in the spring! I've been trying to get resistant genetics so I can limit the chemicals. I'm not rabidly organic, but hope I can one day keep bees that need fewer toxins in the hive. So far I've got Russians, and am enlarging the apiary so I can survive the losses that come with no treatments. If I have 10 in the spring I will be happy. Please don't fret about the dead girls. They are probably the summer bees that are at the end of their lives. The ones reared in the fall are designed to live through a long winter. The hives will start brooding again in the spring (Feb). Your girls are still brooding, it looks like, so they will be fine once some of those bees hatch out(capped brood is cold tolerant). If you want to know what's going on inside use a stethoscope and listen through the hive body walls. You should hear a hummmmm. If not knock on the side and you'll hear them buzzzz then quiet down again. After a while folks say you can even tell when they're going to swarm. You are doing a fine job as a beginner!
If you want to call or visit feel free to. We have an apartment in the basement you can stay over in, or you can make a day trip. I drive up to DC to see my brother that way. It's about 3.5 hrs each way, & 4 lane most of it. Susi
Ooh! I found a beekeeping blog! Just what I was looking for. Thanks! I'm a newbee and appreciate the chance to look over your shoulder.
Can you fix it so clicking an image will make it bigger? Just a thought.
Best,
Tom
bees@clocktech.com
Thanks very much for the kind words. I will think about the photo option. Are there particular kinds of pictures that would be most helpful? (trying to keep in mind here that my online storage space is somewhat limited).
Post a Comment